Lesson 11: Mecanum Drive
Mecanum drive allows movement in any direction. Thus, it is useful for games where maneuverability is required. Mecanum does eliminate basically all pushing ability, so don't expect to win in a pushing match with another robot.
Do how do we program mecanum? There are different ways to do it. You may find a different way that works just as well as the method I am going to teach you. Before we start writing any code, lets do a little bit of preplanning. First, what joysticks will we need to use? Since mecanum moves in all directions, I recommend having one whole stick (both x and y) controlling the direction of the robot, and another axis controlling rotation. This is a total of three axes: x, y, and rot. But what math do we need to do to calculate what wheels should spin and when? The y-axis is the easiest. When you push it to 1, all the wheels should spin forward, when you push it to -1, they should all spin back. Lets create some variables for each wheel and store this value. I will be using the HID object from the Code Red Library to get joystick input in this lesson.
double leftF, leftB, rightF, rightB; // front & back, left & right

leftF = gamepad.axis(LogitechF310.STICK_LEFT_Y);
rightF = gamepad.axis(LogitechF310.STICK_LEFT_Y);
leftB = gamepad.axis(LogitechF310.STICK_LEFT_Y);
rightB = gamepad.axis(LogitechF310.STICK_LEFT_Y);
If you test this code, you can see that pushing the left stick forward will
make the robot move forward, and pushing it backward will make the robot move
backward. Don't forget that you may need to add negatives, as we have learned
before, to account for certain motors being mounted in the reverse orientation.
(If you are using PWMController then just set backwards to
true in the constructor.)
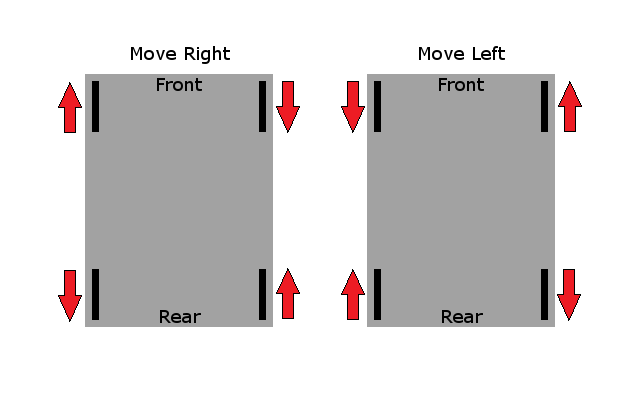
OK, let's do side-to-side movement. In order to move sideways, the wheels need to spin against each other. See the diagram below to see what way the wheels need to spin for each direction. We can simply add values from the x-axis on the gamepad to the variables we already have. This can result in a motor speed greater than 1, but we will account for that later.
We can use negatives to make the wheels spin against each other. Here is the code you should add to do side-to-side movement:
leftF += gamepad.axis(LogitechF310.STICK_LEFT_X);
rightF += -gamepad.axis(LogitechF310.STICK_LEFT_X);
leftB += -gamepad.axis(LogitechF310.STICK_LEFT_X);
rightB += gamepad.axis(LogitechF310.STICK_LEFT_X);
Again, you may need to add/remove negatives. Let's talk about rotation. When the robot is rotating to the right, the right wheels move backwards and the left move forward. We can add this code to account for that:
leftF += gamepad.axis(LogitechF310.STICK_RIGHT_X);
rightF += -gamepad.axis(LogitechF310.STICK_RIGHT_X);
leftB += gamepad.axis(LogitechF310.STICK_RIGHT_X);
rightB += -gamepad.axis(LogitechF310.STICK_RIGHT_X);
I mentioned this earlier, but hopefully you have been paying attention enough to realize: "This shouldn't work, some of the values could be more than 1". You're right. There is a way to make it work though. We find the maximum value out of these four numbers, and if it is bigger than 1, divide each value by that max. This will scale each motor output down to an appropriate value.
double max = Math.max(Math.max(Math.abs(leftF), Math.abs(rightF)), Math.max(Math.abs(leftB), Math.abs(rightB)));

if (max > 1) {
    leftF = leftF / max;
    rightF = rightF / max;
    leftB = leftB / max;
    rightB = rightB / max;
}
All that is left to do is to give these values to the motors:
motorFL.set(leftF);
motorFR.set(rightF);
motorBL.set(leftB);
motorBR.set(rightB);
I really hope you understand why this works... but you probably don't. It's difficult to explain, but let me try summing it up. You have three inputs. Each of these inputs acts on each of the four wheels. You add up the total of all the inputs for each wheel. There is a high chance that these totals are going to be more than 1, so we scale all the values down to numbers that are appropriate for the motor controllers. The negatives that I have in my code are there because side-to-side movement and rotation require some wheels to spin different directions to get the desired motion.
Here is the completed code:
double leftF, leftB, rightF, rightB; // front & back, left & right

leftF = gamepad.axis(LogitechF310.STICK_LEFT_Y);
rightF = gamepad.axis(LogitechF310.STICK_LEFT_Y);
leftB = gamepad.axis(LogitechF310.STICK_LEFT_Y);
rightB = gamepad.axis(LogitechF310.STICK_LEFT_Y);

leftF += gamepad.axis(LogitechF310.STICK_LEFT_X);
rightF += -gamepad.axis(LogitechF310.STICK_LEFT_X);
leftB += -gamepad.axis(LogitechF310.STICK_LEFT_X);
rightB += gamepad.axis(LogitechF310.STICK_LEFT_X);

leftF += gamepad.axis(LogitechF310.STICK_RIGHT_X);
rightF += -gamepad.axis(LogitechF310.STICK_RIGHT_X);
leftB += gamepad.axis(LogitechF310.STICK_RIGHT_X);
rightB += -gamepad.axis(LogitechF310.STICK_RIGHT_X);


double max = Math.max(Math.max(Math.abs(leftF), Math.abs(rightF)), Math.max(Math.abs(leftB), Math.abs(rightB)));

if (max > 1) {
    leftF = leftF / max;
    rightF = rightF / max;
    leftB = leftB / max;
    rightB = rightB / max;
}

motorFL.set(leftF);
motorFR.set(rightF);
motorBL.set(leftB);
motorBR.set(rightB);
Exercises
- Recreate the mecanum drive code from memory. Refer back to this lesson as necessary.
- Apply the knowledge you learned in lesson 10 to a mecanum drive. Try out both solution 1 and solution 2.
Using Code Red's library
Fortunately it's easy to implement a mecanum drive using the Code Red Robot Library. It's important to understand why the library works, however. Do not simply skip over the above section and only learn this way. The Robot Library allows you to not reinvent the wheel. Since you know how to write mecanum drive now, you could do it for 10 different robots and it would be the exact same for each one. That's why we added it into the library.
There is a class called Drive in the library. The goal of the
drive object is to control the entire drive train. The library has two different
types of drive trains, each with their own class that extend the base
Drive class. These two drive trains are tank and mecanum. Let's
implement mecanum. Lets also use some PWMControllers for our motors, and let's
say that the left two motors are mounted on to the robot upside-down. Here is
the entire main robot class required to get the robot moving with mecanum
drive:
public class Robot extends IterativeRobot {

    PWMController leftF, leftB, rightF, rightB;
    HID driveGamepad;
    Drive drive;

    public void robotInit() {
        driveGamepad = new HID(0);
        leftF = new PWMController(Wiring.FRONT_LEFT_MOTOR, true); // this motor is mounted in reverse
        leftB = new PWMController(Wiring.REAR_LEFT_MOTOR, true); // so is this one
        rightF = new PWMController(Wiring.FRONT_RIGHT_MOTOR, false);
        rightB = new PWMController(Wiring.REAR_RIGHT_MOTOR, false);

        drive = new MecanumDrive(leftF, rightF, leftB, rightB);
    }

    public void teleopPeriodic() {
        drive.setXYRot(driveGamepad.axis(LogitechF310.STICK_LEFT_X), driveGamepad.axis(LogitechF310.STICK_LEFT_Y),
                driveGamepad.axis(LogitechF310.STICK_RIGHT_X));
    }
}
Ideally you would use a KeyMap object to keep track of your gamepad, but I did not include that in this lesson for simplicity sake.
Here are a few other things worth mentioning about the robot library's drive objects that don't really fit into this lesson but aren't long enough to create their own lesson from:
- You could also do the same thing with a tank drive. Replace the
MecanumDriveclass with theTankDriveclass. - You can also implement a field oriented drive system using the robot
library. instantiate a
FieldOrientedDriveobject, and give it a drive object to control. (Probably mecanum).