Lesson 2: Creating a New Project and Exploring the Main Robot Class
Before we can write any code, we need to create a new project. Here is how you create a new FRC Java project in Eclipse:
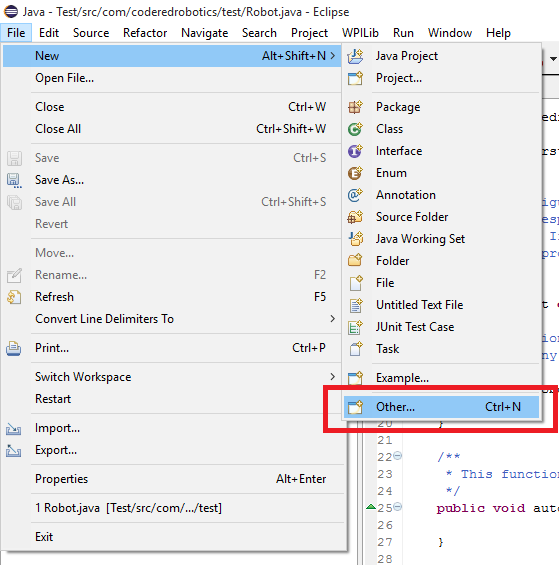
Go to File > New > Other...
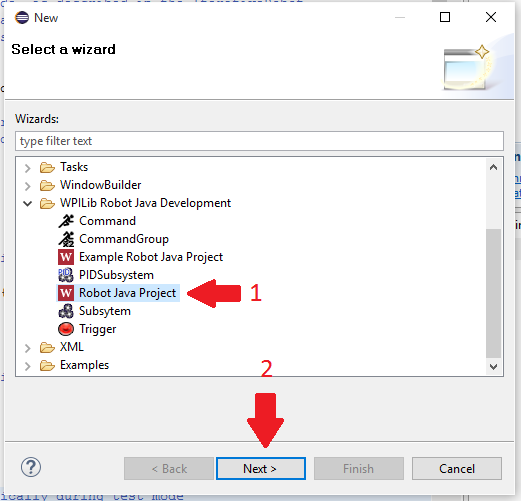
Under "WPILib Robot Java Development", choose "Robot Java Project" and click next:
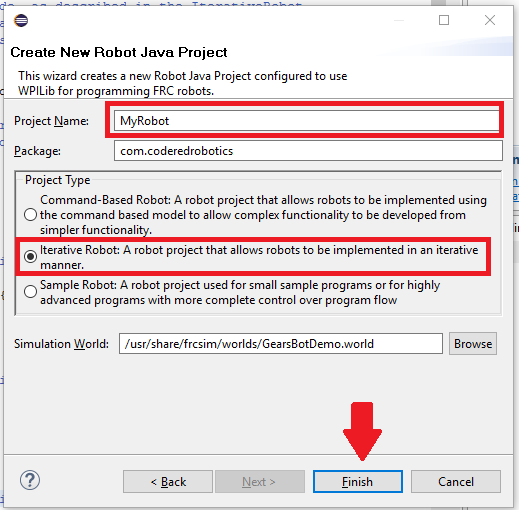
Fill in a Project Name, change the package (optional), and click "Iterative Robot", then click Finish.
If you are using NetBeans, you cannot create a new FRC project from within
NetBeans. You can download an empty
NetBeans project folder and then add the libraries inside of NetBeans by
opening the empty project, right clicking on "Libraries" in the Project pane,
and adding the FRC Java libraries. Renaming/moving the main robot class to a new
location is OK, but you will need to change some values in a properties file
located at {project_root_dir}\build.properties.
Once you have your new project setup, you should see the following code:
package com.coderedrobotics;

import edu.wpi.first.wpilibj.IterativeRobot;

/**
 * The VM is configured to automatically run this class, and to call the
 * functions corresponding to each mode, as described in the IterativeRobot
 * documentation. If you change the name of this class or the package after
 * creating this project, you must also update the manifest file in the resource
 * directory.
 */
public class MyRobot extends IterativeRobot {
    /**
     * This function is run when the robot is first started up and should be
     * used for any initialization code.
     */
    public void robotInit() {

    }

    /**
     * This function is called periodically during autonomous
     */
    public void autonomousPeriodic() {

    }

    /**
     * This function is called periodically during operator control
     */
    public void teleopPeriodic() {

    }

    /**
     * This function is called periodically during test mode
     */
    public void testPeriodic() {

    }

}
This is your main robot class. The methods that you see override methods in the IterativeRobot supertype, and are used to control the robot. These are the most often used methods, but there are some additional methods you can use that are not generated with a new project. Here is a list of all the robot methods that are available:
robotInit(): called once when when the robot is first booted up.autonomousInit(): called once when the robot enters the autonomous period.autonomousPeriodic(): called at 60 Hz (60 times per second) during the autonomous period.teleopInit(): called once when the robot enters the teleoperated period.teleopPeriodic(): called at 60 Hz during the teleoperated period.disabledInit(): called once when the robot becomes disabled.disabledePeriodic(): called at 60 Hz when the robot is a disabled state.testInit(): called once when the robot enters test mode. (Local driver station)testPeriodic(): called at 60 Hz when the robot is in test mode.disabledePeriodic(): called at 60 Hz when the robot is a disabled state.
Note: you are unable to control motors, relays, or pneumatics during the disabled period, and the motors that are running when the robot is enabled will automatically stop running when the robot becomes disabled.